We've added a number of great new features to PTGui 9.0! Below is an overview of the most
important changes.
For a detailed list of new features and changes see the version history. Read the included online help to learn more about a specific feature: context help is available in most screens by pressing F1 (Windows) or Fn+F1 (Mac), or by clicking the Help button in certain windows.
Open the Detail Viewer by clicking the button in the Panorama Editor:

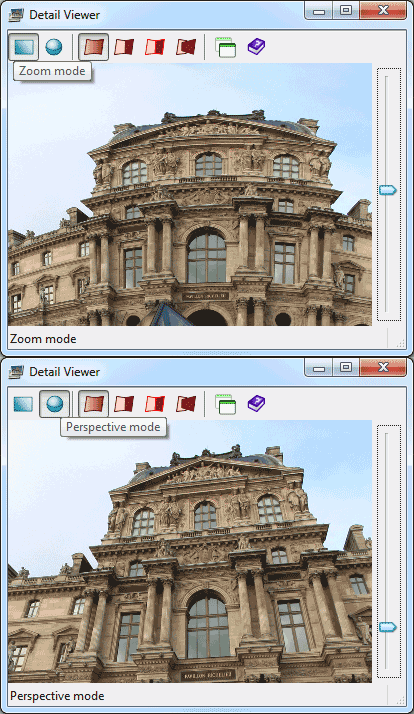
The Detail Viewer can be toggled between Zoom and Perspective mode. In zoom mode it shows an enlarged crop of the panorama in the original perspective. In Perspective mode the detail view is reprojected to flat (rectilinear projection) like in a spherical panorama viewer:
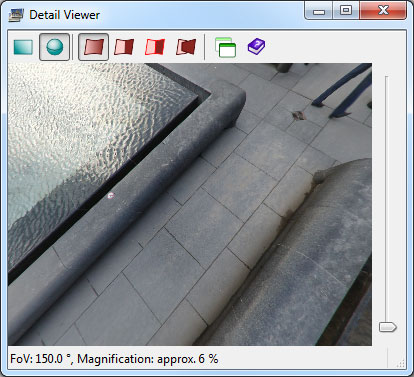
In Perspective mode the Detail Viewer makes it easy to check the nadir and zenith of a panorama, without the need to render the panorama or create cube faces first:
The detail viewer can be navigated by clicking and dragging with the mouse, through the keyboard arrow keys or by moving the magnifier glass to the point of interest in the Panorama Editor.

To hide something paint it red in the Mask tab:
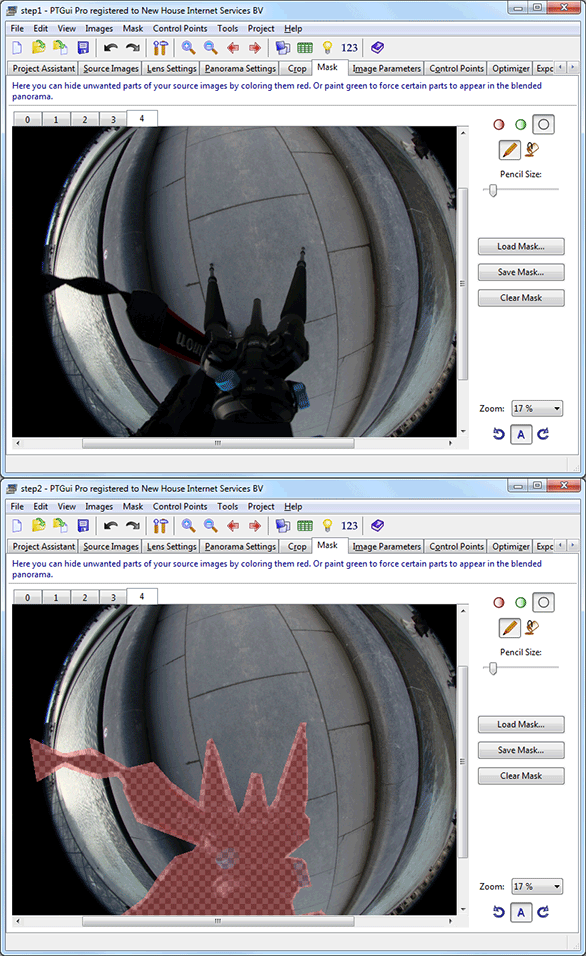
Or to reveal an object paint it green:

For more information about this feature see the tutorial Masking in PTGui Pro.
PTGui 9 comes with a combined Flash/HTML5 web viewer plugin and authoring tool. The viewer works on every computer with Flash 10 installed. It also works on the iPad, iPod, iPhone and the Safari browser without the Flash plugin, through native HTML5 code. The best thing is that you only have to publish your panorama once to make it viewable on all of these platforms. The authoring tool is accessed through Tools -> Publish to Website:
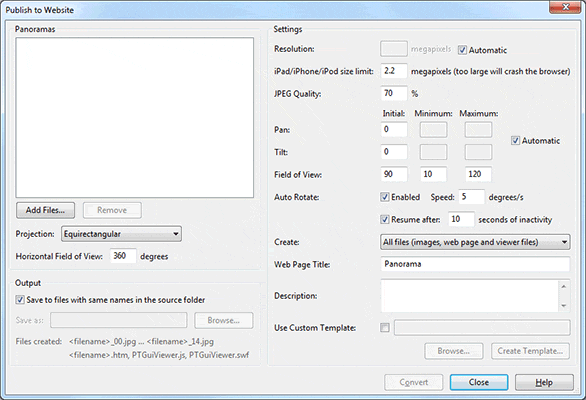
The tool generates all required files in one click, including a basic (customizable) HTML page. View an example panorama here. Press the Help button in Publish to Website for a detailed explanation of the parameters.
From now on all versions, including the Mac version and the standard version are available both in 32 and 64 bit. For Windows only 1 installer is distributed which automatically installs the 64 bit version on 64 bit platforms. For Mac the 64 bit version requires OS X 10.6. We continue to support OS X 10.4 and PowerPC macs through a separate downloadable version of PTGui for OS X 10.4.
You can upgrade from an earlier version to PTGui 9 for an upgrade fee, or free of charge, depending on the original purchase date. A free trial version is available; you can use it next to your current version by installing to a different folder.
For a detailed list of new features and changes see the version history. Read the included online help to learn more about a specific feature: context help is available in most screens by pressing F1 (Windows) or Fn+F1 (Mac), or by clicking the Help button in certain windows.
Detail Viewer
One of the most requested features is the ability to zoom in the panorama editor; the new Detail Viewer makes this possible. The panorama editor wil continue to show an overview of the complete panorama, while you can freely zoom in on details in the Detail Viewer window. The Detail Viewer shows a continuously updated live preview of a selected part of the panorama at full resolution.Open the Detail Viewer by clicking the
 button in the Panorama Editor:

The Detail Viewer can be toggled between Zoom and Perspective mode. In zoom mode it shows an enlarged crop of the panorama in the original perspective. In Perspective mode the detail view is reprojected to flat (rectilinear projection) like in a spherical panorama viewer:

In Perspective mode the Detail Viewer makes it easy to check the nadir and zenith of a panorama, without the need to render the panorama or create cube faces first:

The detail viewer can be navigated by clicking and dragging with the mouse, through the keyboard arrow keys or by moving the magnifier glass to the point of interest in the Panorama Editor.
Blend modes
Both the Panorama Editor and the Detail Viewer offer 4 different blending modes. In the Show Seams mode the locations of the seams are highlighted by red lines. This makes it easy to spot potential alignment or blending faults:
Masking (PTGui Pro only)
The Pro version has a new 'Mask' tab. Masking allows you to hide a part of an image from the final blended panorama (the missing part is filled with content from other overlapping images). Or the other way round: you can force the blender to reveal a certain part of an image by hiding the overlapping parts of other images.To hide something paint it red in the Mask tab:

Or to reveal an object paint it green:

For more information about this feature see the tutorial Masking in PTGui Pro.
Publish to Website
Publishing an interactive panorama to a website has been possible for years using the QuickTime VR converter in PTGui. Unfortunately on many computers QuickTime is not installed and Apple has stopped supporting QTVR in recent versions of QuickTime. Therefore Flash is now the format of choice for publishing panoramas, but Flash is not supported on the iPad, iPod and iPhone.PTGui 9 comes with a combined Flash/HTML5 web viewer plugin and authoring tool. The viewer works on every computer with Flash 10 installed. It also works on the iPad, iPod, iPhone and the Safari browser without the Flash plugin, through native HTML5 code. The best thing is that you only have to publish your panorama once to make it viewable on all of these platforms. The authoring tool is accessed through Tools -> Publish to Website:

The tool generates all required files in one click, including a basic (customizable) HTML page. View an example panorama here. Press the Help button in Publish to Website for a detailed explanation of the parameters.
64 bit support
Previously only PTGui Pro for Windows was available in a 64 bit version. The 64 bit version allows PTGui to access more memory (32 bit applications are limited to 3 GB of RAM) and this results in significant faster stitching of large panoramas if you have enough RAM memory installed.From now on all versions, including the Mac version and the standard version are available both in 32 and 64 bit. For Windows only 1 installer is distributed which automatically installs the 64 bit version on 64 bit platforms. For Mac the 64 bit version requires OS X 10.6. We continue to support OS X 10.4 and PowerPC macs through a separate downloadable version of PTGui for OS X 10.4.
Extended Template functionality (PTGui Pro only)
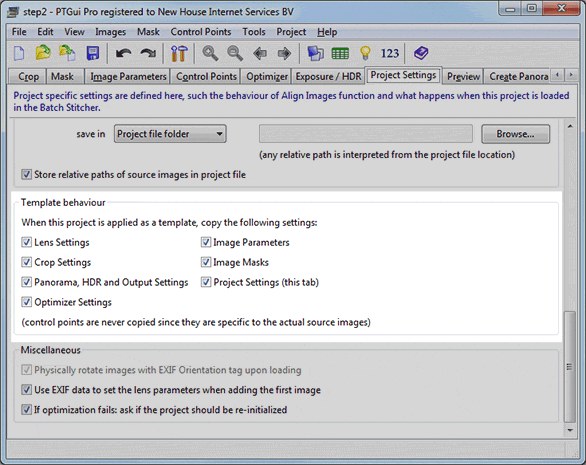
Through the new 'Template behaviour' settings, a template can be created which only applies to a part of a project. This for example enables 'optimizer templates', which only change the settings of the optimizer:
Other changes
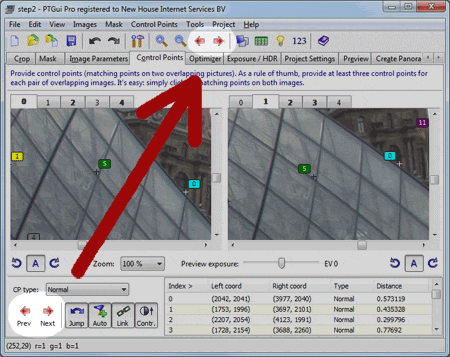
If you are upgrading from an earlier PTGui version, the following changes are worth noting:- The Previous/Next Image Pair arrow buttons have moved to the main toolbar. They now
function in the Crop and Mask tabs as well:
- Zooming is now done by rolling the mouse wheel while holding down the Control key (Windows) or Command key (Mac). The former behaviour is still available as an option (see Mouse Wheel Action in the Options/Preferences).
- The Panorama Tools optimizer is now accessed through the PTOptimizer application instead of through pano12.dll / Panotools.bundle. If you've previously used the Panorama Tools optimizer then you need to download PTOptimizer and change a setting. More information...
Download
To try out the new features PTGui 9 can be downloaded here.You can upgrade from an earlier version to PTGui 9 for an upgrade fee, or free of charge, depending on the original purchase date. A free trial version is available; you can use it next to your current version by installing to a different folder.